


Hello everyone. In this article, I will introduce you to Appwrites database, its service with server-side SDK, comparison between server-side SDK and client-side SDK, appwrite CLI, and real-time updates followed by code examples. As I prefer to write my code in Typescript, that is what I am going to use for my code examples. Feel free to implement code examples you find in this article in any of your projects.
This article is split into several sections and subsections:
But, before I get into the database part, I believe that a small introduction to Appwrite is necessary for anyone who is not familiar with Appwrite, yet.
What is Appwrite?
Appwrite is a Backend-as-a-Service (BaaS) that gives developers tools to build fast and secure applications. Appwrites core is built with PHP but it is followed by different SDKs so it allows most developers to implement Appwrites service in their code environment.
Top things about Appwrite that makes it so great:
- It is Open Source
- It is self-hosted
- Easy to use
- Cross-platform
Things that Appwrite brings to the table for your project:
- Backend console UI
- Cloud functions with CRON feature
- CRON tasks
- GEO & Localization
- User authentication with many OAuth providers
- Permissions
- Teams
- File storage
- Database
But, as mentioned, in this article, the main focus is database service.
Database intro
Appwrite database is currently made of collections, documents, rules, and permissions. I will not go deep into these terms, but will shortly explain what each one is, with provided anchor links to the official documentation.
- Collection is a group of documents. You can consider collection as a database table.
- Documents are part of a collection and are made of rules.
- Rules are document properties in which data is stored.
- Permissions are tied to both collections and documents. They determine who has read or write access to your collections or documents, and who does not.
Appwrite configuration setup
Before we can do any work with appwrite, we need to install dependencies and initialize clients, assuming we have appwrite instance and appwrite project up and running.
As we will be working with both the server-side SDK and client-side SDK, we need to install both with this command:
npm install appwrite node-appwrite
After installation create a file where your clients will be initialized. If you wish, you can separate clients into separate files, but for the simplicity of this example, I will initialize both in the same file and export them for further use in the application.
appwrite.config.ts
import { Appwrite as Appwrite_WEB } from 'appwrite';
import { Client as Appwrite_NODE, Database } from 'node-appwrite';

const CLIENT_WEB = new Appwrite_WEB();
const CLIENT_NODE = new Appwrite_NODE();
const DATABASE = new Database(CLIENT_NODE);

CLIENT_WEB
 .setEndpoint(process.env.APPWRITE_ENDPOINT)
 .setProject(process.env.APPWRITE_PROJECT_ID);

CLIENT_NODE
 .setEndpoint(process.env.APPWRITE_ENDPOINT)
 .setProject(process.env.APPWRITE_PROJECT_ID)
 .setKey(process.env.APPWRITE_API_KEY);

export { CLIENT_WEB, CLIENT_NODE, DATABASE };
Now that we created our configuration file, we can simply import CLIENT_WEB, CLIENT_NODE, DATABASE into other files and use appwrite service.
Database service for server with Node.js SDK
With server-side SDK you can do CRUD functions against both collections and documents with database API. I will go through them and show you how to use database service with server-side SDK.
Remember that in appwrite configuration setup we initialized our SDKs so we can simply start using them. Initialization of server-side SDK with API key runs it in admin mode, which means you can access all project resources with no restrictions.
If you check back on that code example, you can see that I initialized DATABASE service in a separated constant. If you're wondering why is it necessary, each server-side SDK service requires node.js SDK initialized client in its constructor.
Let's go through CRUD functions for both collections and documents and that will give you tools to build your own application in the process, assuming you already have your appwrite instance and project up and running.
In addition, I will create a separate service wrapper for appwrite database service in a new file.
Database service
Let's create a new file called appwrite.database.service.ts and put it inside a folder of your own choosing. I prefer to put it inside the services folder. A good reason to create an API wrapper is that within the wrapper I can write more complex functions than what appwrite API provides, when necessary. But, for now, we will not go deep into complexity.
NOTE that my import paths are not set in stone and are project-based.
appwrite.database.service.ts
import { DATABASE } from '$lib/service/appwrite/appwrite.config';

export const DATABASE_API = {
    // We will add our wrapper functions in this object
}
Collections
Create your first collection
Let's add our first function to the API wrapper to create a collection
export const DATABASE_API = {
    ...
    createCollection(name: string, read: string[], write: string[], rules: string[]) {
        return DATABASE.createCollection(name, read, write, rules);
    }
    ...
}
To use it, simply import DATABASE_API in your file and call the function you need.
Get collection
To get a collection from a database, you will need to know that collection ID, as it is the required parameter of the getCollection function.
export const DATABASE_API = {
    ...
    getCollection(collectionID: string) {
        return DATABASE.getCollection(collectionID);
    }
    ...
}
Let's see what kind of a result will we get when running this command in our code, assuming we know a certain collection ID.
import {DATABASE_API} from '$lib/service/appwrite/appwrite.database.service';

DATABASE_API.getCollection('617711e9b47e4')
.then(result => console.log(result));
Result

Update collection
Update collection function works similarly to getCollection. It takes collection ID as a required parameter, but it has another required parameter, which is collection name. Optional parameters are read and write permissions and rules.
export const DATABASE_API = {
    ...
    updateCollection(collectionID: string, name: string, read?: string[], write?: string[], rules?: string[]) {
        return DATABASE.updateCollection(collectionID, name, read, write, rules);
    }
    ...
}
Using this function in your code will return the same object from the Get collection example, only with updated data.
Delete collection
This one is fairly simple, as the one to get our collection. It takes collection ID as the only required parameter and does not have optional parameters.
export const DATABASE_API = {
    ...
    deleteCollection(collectionID: string) {
        return DATABASE.deleteCollection(collectionID)
    }
    ...
}
Be cautious with this function because it will also delete all documents you have stored inside that collection. I advise you to implement an alert message in your frontend application before deletion so you don't experience accidental deletion of a collection.
List collections
Last API function for collections is listCollections.
It has 4 optional parameters you can use to generate a preferred list of your collections: search, limit, offset, and order type.
Let's create a few functions to list our collections
Plain list
export const DATABASE_API = {
    ...
    listCollections() {
        return DATABASE.listCollections();
    }
    ...
}
List with optional parameters
export const DATABASE_API = {
    ...
    listCollections(
    search?: string, // results filter
    limit?: number, // Default 25, maximum 100 results
    offset?: number, // Default 0, manages pagination
    orderType?: string // Takes ASC or DESC value
    ) {
        return DATABASE.listCollections(search, limit, offset, orderType);
    }
    ...
}
Documents
Create your first document
To create your first document you need 2 things:
- collection id - Id of a collection you want to create a document in
- data - JSON data object that stores document values
- Document contains data based on collection rules
Let's create our createDocument function:
export const DATABASE_API = {
    ...
    createDocument(collectionID: string, data: any, read?: string[], write?: string[]) {
        return DATABASE.createDocument(collectionID, data, read, write);
    }
    ...
}
And then let's run it in our code
import {DATABASE_API} from '$lib/service/appwrite/appwrite.database.service';

DATABASE_API.createDocument('617711e9b47e4', formData, ['role:guest'], ['role:guest'])
.then(result => console.log(result));
Result

Get document
Get document function works pretty much like getCollection. It takes collectionID and documentID as required parameters
export const DATABASE_API = {
    ...
    getDocument(collectionID: string, documentID: string) {
        return DATABASE.getDocument(collectionID, documentID);
    }
    ...
}
Let's try to get one document from our collection to see what kind of result we will get
import {DATABASE_API} from '$lib/service/appwrite/appwrite.database.service';

DATABASE_API.getDocument('617711e9b47e4', '617c41457fef3')
.then(result => console.log(result));
Result - document we earlier created

Update document
To update a document we require collectionID, documentID, and data as required parameters. Read and write permissions are taken as optional parameters only.
export const DATABASE_API = {
    ...
    updateDocument(collectionID: string, documentID: string, data: any, read?: string[], write?: []) {
        return DATABASE.updateDocument(collectionID, documentID, data, read, write);
    }
    ...
}
Executing this function would return the same object from the Get document example, but with updated values.
Delete document
Delete document function takes collectionID and documentID as required parameters. Execution of this function permanently deletes a document from your database.
export const DATABASE_API = {
    ...
    deleteDocument(collectionID: string, documentID: string) {
        return DATABASE.deleteDocument(collectionID, documentID);
    }
    ...
}
I advise you to implement an alert message in your frontend application before deletion so you don't experience accidental deletion of a document.
List documents
To list all documents, the API function takes only one required parameter - collectionID
export const DATABASE_API = {
    ...
    listDocuments(collectionID: string) {
        return DATABASE.listDocuments(collectionID);
    }
    ...
}
But, there are optional parameters that take this function to the next level.
export const DATABASE_API = {
    ...
    listDocuments(
    collectionID: string,
    filters?: string[], // Example: 'population<10000' or 'isTrue=true',
    limit?: number, // Number of results returned. Default is 24, maximum is 100,
    offset?: number, // Used to manage pagination. Default is 0
    orderField?: string, // Document field to sort documents by
    orderType?: string, // Order direction that takes either ASC or DESC values
    orderCast?: string, // Order field type casting
    search?: string // Search query
    ) {
        return DATABASE.listDocuments(collectionID, filters, limit, offset, orderField, orderType, orderCast, search);
    }
    ...
}
Whole service file
appwrite.database.service.ts
import { DATABASE } from '$lib/service/appwrite/appwrite.config';

export const DATABASE_API = {
    createCollection(name: string, read: string[], write: string[], rules: string[]) {
        return DATABASE.createCollection(name, read, write, rules);
    },
    getCollection(collectionID: string) {
        return DATABASE.getCollection(collectionID);
    },
    updateCollection(
        collectionID: string,
        name: string,
        read?: string[],
        write?: string[],
        rules?: string[]
    ) {
        return DATABASE.updateCollection(collectionID, name, read, write, rules);
    },
    deleteCollection(collectionID: string) {
        return DATABASE.deleteCollection(collectionID);
    },
    listCollections(
        search?: string, // results filter
        limit?: number, // Default 25, maximum 100 results
        offset?: number, // Default 0, manages pagination
        orderType?: string // Takes ASC or DESC value
    ) {
        return DATABASE.listCollections(search, limit, offset, orderType);
    },
    createDocument(collectionID: string, data: any, read?: string[], write?: string[]) {
        return DATABASE.createDocument(collectionID, data, read, write);
    },
    getDocument(collectionID: string, documentID: string) {
        return DATABASE.getDocument(collectionID, documentID);
    },
    updateDocument(collectionID: string, documentID: string, data: any, read?: string[], write?: []) {
        return DATABASE.updateDocument(collectionID, documentID, data, read, write);
    },
    deleteDocument(collectionID: string, documentID: string) {
        return DATABASE.deleteDocument(collectionID, documentID);
  },
  listDocuments(
    collectionID: string,
    filters?: string[], // Example: 'population<10000' or 'isTrue=true',
    limit?: number, // Number of results returned. Default is 24, maximum is 100,
    offset?: number, // Used to manage pagination. Default is 0
    orderField?: string, // Document field to sort documents by
    orderType?: string, // Order direction that takes either ASC or DESC values
    orderCast?: string, // Order field type casting
    search?: string // Search query
  ) {
    return DATABASE.listDocuments(collectionID, filters, limit, offset, orderField, orderType, orderCast, search);
  }
};
Comparison of client and server SDKs
When you compare client and server SDK, you can notice that there are limits on what you can do with a client SDK in comparison to server SDK. With client SDK, you can manipulate with documents only, but it does not give you tools to manipulate with collections as well.
The reason for that is security. As I mentioned in the database introduction, you can consider collections as database tables, but also, you can consider documents as database rows. If an end-user would be allowed to manipulate with database table settings, or in our case collections, it would be a high-security risk for your application. Unless your applications feature is to give end-users to create their collections, but in addition that they can not touch other user collections by adding proper permissions.
The code-wise comparison shows that API functions between client and server SDK are identical, so you don't have to worry about learning new code as well.
But, database limits with WEB SDK come with other benefits, and that is real-time updates that I will describe in the next section down below.
Real-time updates
Real-time updates use the subscription method to listen to specific channels for server-side changes with Websocket. Currently, you can only subscribe to channels on the client-side, while not on the server-side.
Currently, you can listen to account, collections, documents, files, teams, memberships, and function events, but let's give a focus to database channels and events.
Note that for your application to listen to those events, your application must have initialized window first before your real-time subscription can do its magic.
If a subscription tries to connect with a window and you don't have it initialized before the web socket tries to establish a connection, you will get an error:
500
ReferenceError: window is not defined
Example #1 - Listen to collection events
CLIENT_WEB.subscribe(['collections'], function(response) {
    console.log(response)
});
In example #1, we subscribe to the collections channel. Whenever any collection is updated, the response returns this kind of an object in our console, with all updates we did:
channels: Array(2)
    0: "collections"
    1: "collections.617711e9b47e4"
    length: 2
    [[Prototype]]: Array(0)
    event: "database.collections.update"
    payload:
    $id: "617711e9b47e4"
    $permissions: {read: Array(1), write: Array(1)}
    dateCreated: 1635193321
    dateUpdated: 1635422331
    name: "World Cities"
    rules: (4) [{…}, {…}, {…}, {…}]
    [[Prototype]]: Object
    timestamp: 1635422331
    [[Prototype]]: Object
Example #2 - Return collection name update in real-time
Now, in the next example let's try to update the collection name that is displayed somewhere in our frontend application.
First, let's call a function that returns the current collection name from the database and append it to the variable. We need to do that from node-appwrite SDK.
let collectionName = NODE_API.getCollection(slug).then((response: any) => {
    return response.name
});
Then, as we already subscribed to the collections channel in our first example, we can update the collectionName variable every time we update our collection, like this:
CLIENT_WEB.subscribe(['collections'], function(response: any) {
    collectionName = response.payload.name;
});
This is a full code example of how to do it in Svelte Kit application, but the same principle applies to other types of frontend applications:
<script lang="ts" context="module">
    import {onMount} from 'svelte';
    import { CLIENT_WEB } from '$lib/service/appwrite/appwrite.config';
</script>

<script lang="ts">
    // Initiate default value
    let collectionName = CLIENT_WEB.getCollection(collectionId).then((response: any) => {
        return response.name
    });

    // Subscribe to updates and append updated value to the variable
    // Subscribed inside onMount because onMount is where browser window is loaded
    onMount(async() => {
        CLIENT_WEB.subscribe(['collections'], function(response: any) {
            collectionName = response.payload.name;
        });
    })
</script>

<h1>
    {#await collectionName}
        {:then name}
        <div>
            <div>
                <Label>{name}</Label>
                <Button outline color="info">Edit</Button>
                <Button outline color="danger" on:click={deleteCollection}>Delete</Button>
             </div>
        </div>
        {:catch error}
          <p style="color: red">{error.message}</p>
      {/await}
</h1>
So, as I only needed to update the collection name in real-time, I only took the collection name from the response payload and appended it to collectionName variable.
Example #3 - Subscribe to document events
To listen to only document events, you can subscribe to the documents channel:
CLIENT_WEB.subscribe(['documents'], function(response) {
    console.log(response)
});
Each time a document is created, updated, or deleted inside any collection, the subscription will return a response object to your application, similar to the one you can see in example #1, with channels, event, and payload properties.
Example #4 - Subscribe to only specific collection or document events
You can even subscribe to channels that listen to specific documents or collections only.
CLIENT_WEB.subscribe(['collections.617711e9b47e4'], function(response: any) {
    console.log(response)
});

CLIENT_WEB.subscribe(['collections.617711e9b47e4.documents'], function(response: any) {
    console.log(response)
});

CLIENT_WEB.subscribe(['documents.61772af74de89'], function(response: any) {
    console.log(response)
});
With this section, there is all you need to know how to use appwrites real-time feature and implement it inside your application. If you would like to read more about appwrites real-time feature, feel free to go to official real-time documentation.
Database with appwrite CLI
To work with Appwrite command line interface there are a few things to do before using it.
First, you need to install appwrite command line interface. Since my working environment is windows, this is the command to use to install it on windows with PowerShell:
iwr -useb https://appwrite.io/cli/install.ps1 | iex
After setup completes, you can validate installation with the version command
appwrite version
If appwrite CLI is installed, the appwrite version command should return results in your command console like this:

To start using appwrite CLI you need to:
- have your appwrite instance up and running
- create appwrite project
- create project API key with collections and documents scopes
- for testing purposes, feel free to select all scopes upon API key creation
After your appwrite instance is up and running, and you have created the project and its API key, it's time to use appwrite CLI.
The last step of setting up appwrite CLI is running the command
appwrite init
appwrite init command will prompt a few basic inputs to set project preferences so you can use CLI with your command interface, like this
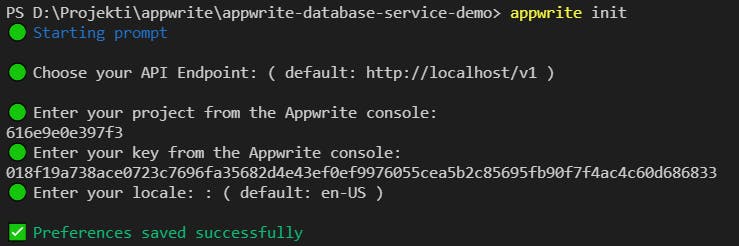
As you can see from the image, it will prompt you to enter
- API endpoint
- project ID
- project API key
- your locale
When your preferences are set, you're ready to use appwrite CLI.
Note that when you want to change your appwrite CLI preferences, you will have to run the appwrite init command again.
The basic structure of appwrite CLI commands is this:
appwrite [SERVICE] [COMMAND] --[OPTIONS]
For blog purposes I already created a collection with a few documents in my database.
So, let's try it out with the getCollection command to see what kind of result will we get.
I will run a CLI command to get information about my collection:
appwrite database getCollection --collectionId=YOUR_COLLECTION_ID
Result returned all information about my collection that I need
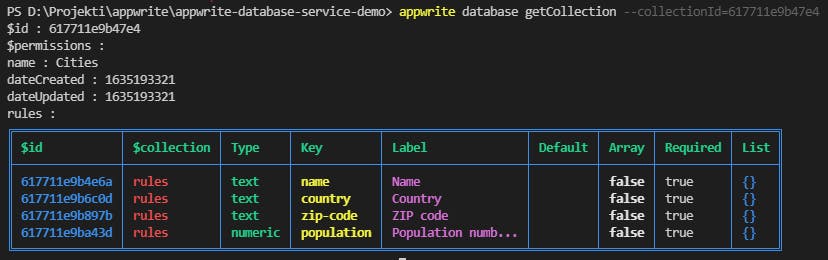
As you can see, it returns all collection properties. And rules are nicely populated inside CLI table :smiley:
Now, let's check if our collection contains any documents by running this command
appwrite database listDocuments --collectionId=YOUR_COLLECTION_ID
Result returned all documents from the collection

Now that I listed all documents from my collection, I will go deeper and get the first document information by running the command
appwrite database getDocument --collectionId=617711e9b47e4 --documentId=61771f4571d90
As a result, I got document properties and their values

To check other available CLI functions you can run these commands
appwrite help
appwrite [SERVICE] help // Eg: appwrite database help
appwrite [SERVICE] [COMMAND] --help // Eg: appwrite database getCollection --help
Conclusion
This concludes this blog post. I highly recommend trying Appwrite as it offers a huge range of possibilities for your project. It's worth mentioning that Appwrite has over 13.5K stars on Github, over 1K forks, and is also a premium partner of Hacktoberfest 2021.
If you would like to check more appwrite resources, here are some that might give you a spark to start using it:
Also, feel free to join appwrite discord server which currently has over 4000 members, with new members coming in every day! Community, along with the core appwrite team, will guide you through every step of using appwrite should you ever get stuck which makes it a community worth being part of.
I hope you found this article helpful in any way. Feedback is highly appreciated, either through comments, discord, or social networks.